Learn how to add clickable social media icons to your email signature. The guide covers downloading PNG icons, inserting them in the Gmail signature editor, highlighting each icon and using the link button to connect it to your social profile. Duration: 5 min.
Video Transcript
In this tutorial we show you step by step how to add clickable social media icons to your email signature so recipients can reach your profiles in one click. We use Gmail in this guide, but the same idea works in most email clients.
First, get your icon images. Download small PNG icons for each platform you want, such as LinkedIn, Instagram, Facebook and X. PNG works best because every email client displays it cleanly with a transparent background.
Open Gmail, click the gear icon in the top right, then click See all settings. On the General tab, scroll down to the Signature section. Click Create new to make a signature or click inside your existing one. Place your cursor where you want the icons to appear.
In the formatting toolbar at the bottom of the signature box, click the Insert image button, the one that looks like a small picture of mountains. Upload your first icon or paste its image address, then insert it.
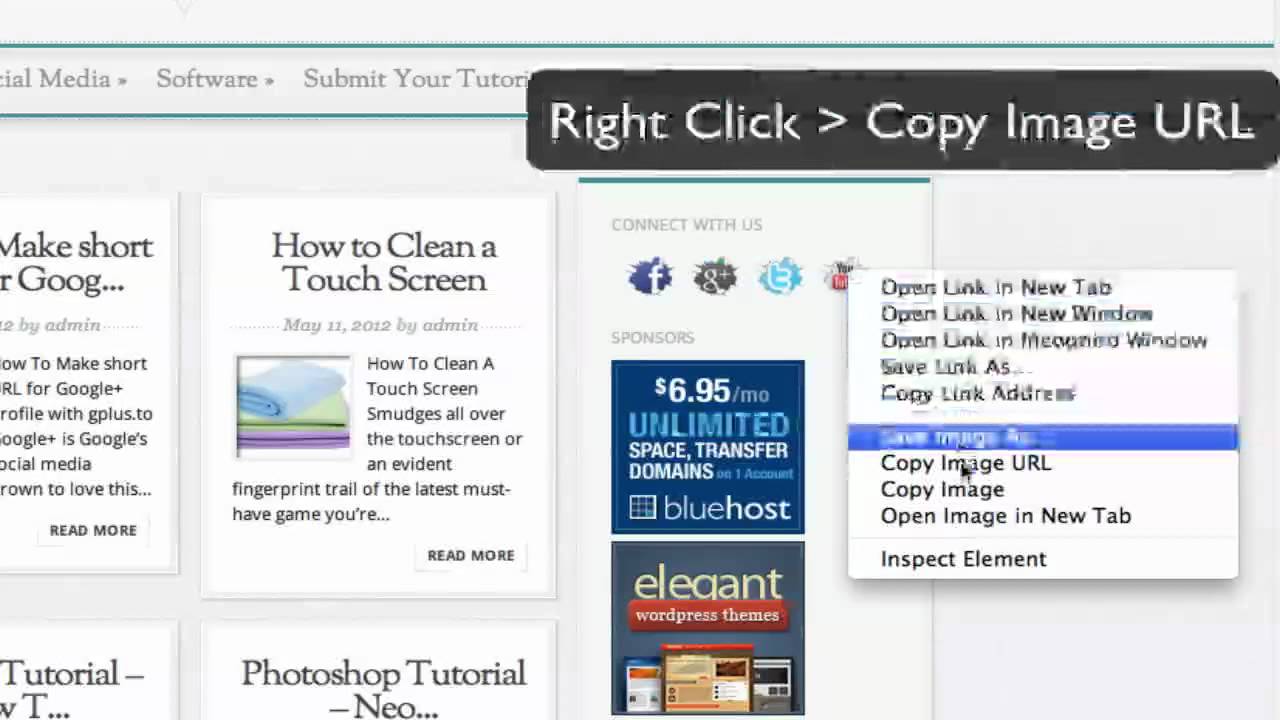
Now make it clickable. This is the part people get wrong. Do not just click the icon. Click and drag to highlight the icon image, then click the Link button in the toolbar. In the web address field paste the full URL of your social profile, for example your LinkedIn page, and click OK.
Repeat the insert and link steps for each social platform. Keep the set small, three to five icons looks cleanest. When all icons are added and linked, scroll down and click Save Changes.
Finally send a test email to yourself to confirm the icons appear and every link opens the correct profile. That is how you add social media icons to your email signature.
Watch the full video above to see exactly where to click, then follow the written 8 steps underneath.
What you'll see in this video
- Opening Gmail Settings, See all settings, and the Signature section
- Inserting a small social media icon image into the signature
- Selecting (highlighting) the icon you just inserted
- Clicking the Link button and pasting your profile URL
- Saving and seeing the signature appear in a new email
Why Add Social Media Icons to Your Email Signature?
A row of clickable social media icons turns every email you send into a quiet invitation to connect. Instead of a plain text link, recipients see familiar logos for LinkedIn, Instagram, Facebook or X and can reach your profile in one tap. The setup is the same in principle across Gmail, Outlook and Apple Mail: insert each icon as a small image, then wrap it in a hyperlink to your profile. The one detail that trips people up is the linking step. You have to highlight the icon image before clicking the Link button, not just click the icon. Get that right and the rest is quick. We use Gmail in this guide because it is the most common client, and the method transfers cleanly to the others.
8 Steps to Add Social Media Icons to Your Email Signature
Follow along with the video above as you work through these steps. As shown in the clip, watch carefully the order, insert the icon, highlight it, then click Link. Highlighting first is the part most tutorials skip.
- Get small PNG icons for each platform you want, such as LinkedIn, Instagram, Facebook and X. PNG is best because it displays cleanly with a transparent background in every email client.
- In Gmail, click the gear icon in the top right, then click See all settings to open the full settings page.
- On the General tab, scroll down to the Signature section. Click Create new to make a new signature, or click inside your existing signature to edit it.
- Click in the signature box where you want the row of icons to appear, usually on a new line below your name and title. Watch in the video above how the icon is highlighted before clicking Link, that is the easy-to-miss part.
- In the formatting toolbar, click the Insert image button (the small mountains icon). Upload your icon file or paste its image address, then insert it.
- Do not just click the icon. Click and drag to highlight the icon image, then click the Link button in the toolbar. This is the step most people miss. As shown in the video, repeat the same insert-highlight-link sequence for every social icon.
- In the web address field, paste the full URL of your social profile, for example https://linkedin.com/in/yourname, and click OK. Repeat the insert and link steps for each platform.
- Scroll down and click Save Changes. Then send a test email to yourself to confirm the icons appear and each one opens the correct profile.
Things to Keep in Mind
- Highlight the icon before linking, do not just click it. This single mistake is why most icons end up showing but not clickable. Click and drag across the image, then use the Link button.
- Keep icons small and consistent. Around 24 to 32 pixels square, all the same size and style, keeps the signature tidy and professional. Mismatched sizes look untidy in the recipient inbox.
- Upload icons rather than hotlinking from a random web address. Externally hosted images often break or get blocked, leaving empty boxes. Uploading through the editor embeds them reliably.
- Limit yourself to three to five platforms. Too many icons clutter the signature and dilute the call to action. Prioritise the platforms where you are actually active.
- Always send a test email after saving. How a signature looks in the editor and how it renders in a real inbox can differ, so confirm every icon shows and every link works before relying on it.
Tips for a Polished Signature
- Use monochrome icons for formal or corporate signatures and coloured icons for creative or consumer brands. Either way, keep all icons in the same style so the row looks intentional.
- Have your profile URLs copied and ready before you start, so you can paste each link quickly without leaving the signature editor to look them up.
- Double-check each link points to the right profile. It is easy to paste your LinkedIn URL onto the Instagram icon by mistake. Test every icon in the sample email.
- In Google Workspace, an admin can manage signatures centrally for the whole organisation, so everyone gets the same icon set without setting it up individually.
Frequently Asked Questions
What image format is best for email signature icons?
PNG is the best format for social media icons in an email signature. It supports transparent backgrounds and displays cleanly across Gmail, Outlook and Apple Mail. Keep each icon small, around 24 to 32 pixels, so the signature stays compact and loads quickly.
Why is my icon not clickable after I add it?
The most common mistake is clicking the icon instead of highlighting it. To add a link, click and drag across the icon image to select it, then click the Link button and paste your profile URL. If the icon still will not link, your email may be in plain text mode, which strips images and links.
How many social media icons should I add?
Three to five icons is the sweet spot. A smaller set keeps the signature clean and focuses attention on the platforms that matter most. For business use, LinkedIn is usually the most valuable, followed by the platforms where you publish content most often.
Why do my icons show as broken images or attachments?
This usually happens when icons are linked from an unreliable external URL or pasted rather than uploaded. Upload icons directly through the signature editor where possible. In Outlook, save the icons locally and drag them into the signature editor so they embed properly instead of appearing as attachments.
Can I add social media icons in Outlook and Apple Mail too?
Yes. The idea is the same in every client, only the menus differ. In Outlook open the signature editor, insert each icon image, then select it and use the Hyperlink button. In Apple Mail open Mail settings, go to Signatures, drag in the icon images, highlight each one and use the Link option to add the URL.